Manager and administrator help
USER FIRST AID | HR MANAGER HELP
For
help, please contact support@upsteem.com.
Invitation to join a group – organisation, department, project or activity group
If you have received an invitation to join a group in the Upsteem.com system, i.e.:
then that means it was sent to you by a user in the Upsteem.com system who thinks you have a contribution to make in that group. Invitations to join different groups can be sent by users in the relevant role – managers, HR managers, administrators and, in the case of projects, project managers and persons responsible for projects. To join, just follow the instructions in the e-mail that was sent to you. |
Organisations, groups and projects
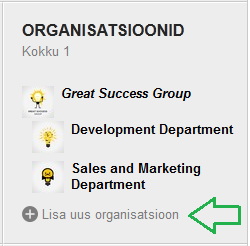
Upsteem.com is designed above all for professional use and thus all of the units in the system – departments, projects, activity groups – must be connected with a specific organisation. You should start by adding your own organisation. To do this, click on the button “Add new organisation”, which you will find in the ORGANISATIONS section of the right pane of your desktop window. As the organisation creator, you will automatically be assigned as working in the organisation and in the roles of Manager and Administrator. An HR Admin module icon will also appear on your Desktop. Read more about this here We have tried to make the structure of Desktops and profiles as uniform as possible for both individual users and groups (organisation, department, project and activity group. Just as you have a personal Desktop, so does each organisation. To go to your organisation’s Desktop, click the organisation’s name in the right pane of your Desktop.If you have the role of administrator, manager or HR manager in the organisation, you will be able to access the organisation profile from the organisation desktop. |
 |
|
Once the organisation has been created, you can continue by creating departments, projects and activity groups. It’s just as easy as creating the organisation itself. Go to the organisation’s Desktop and in the right pane, choose the unit you want to add:
and click the "Add new..." button. Note: The most convenient way to add departments and positions is to use the PEOPLE tab in the left pane of the Desktop. |
||
Summary:
|
||
Employees in Upsteem.com see only the organisations and units they are personally associated with. If desired, public projects or activity groups may be created.
Connections may be created in the Upsteem.com system between parents and subsidiaries.
Group desktops and profiles
We have tried to make the structure of Desktops and profiles as uniform as possible for both individual users and groups (organisation, department, project and activity group). Thus, just as you have a personal Desktop, so does each organisation, department, project and activity group. The groups associated with you – the ones in which you are a member – are displayed in the relevant section of the right pane of your Desktop. You can access the group’s Desktop by clicking on the group name. Groups’ desktops are fairly similar to your own Desktop – they, too, are divided into two panes. The left one has tabs, and the option of messaging the group as well as the members and other groups associated with the group.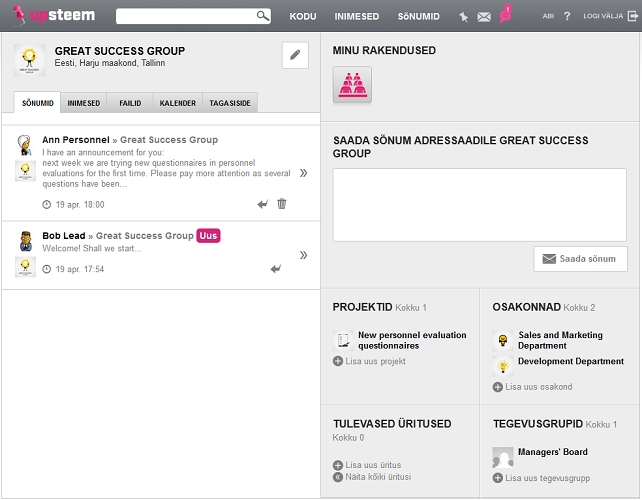 |
|
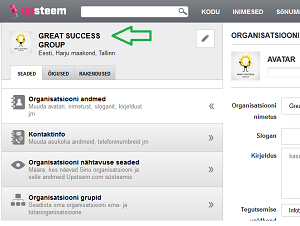
You can access the group profile from the group’s Desktop. Just as your own Desktop has a pencil icon in the upper left section, so do groups’ Desktops. The structure of the group’s profile page is similar to your own profile. |
|
 |
On the group profile page, you can:
|
Note: A group’s so-called ordinary members do not see the
group profile. To get the most out of the system, please be sure to read through the chapter on roles and privileges! |
|
Adding people to groups and sending invitations
| The most convenient way to add people to groups is to use the PEOPLE tab in the left pane of the group’s Desktop. The PEOPLE tab of organisations and departments displays the structure tree. Based on your privileges, the different departments will have buttons for adding people. To add someone, click the button “Add employment ” in the appropriate department, and then, in the position profile that pops up on the right, click the “Invite people” button". 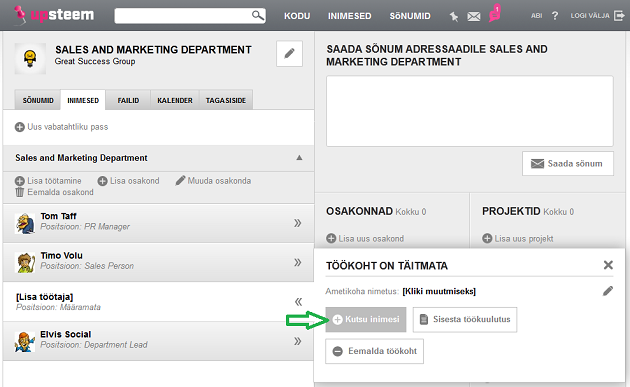 |
|
Adding people takes place through invitations. Clicking on the “Invite people” button on the position profile brings up the search and invite form. It is always a good idea to first check whether the person you are about to add is already a registered user in the system. Only then invite the person via e-mail using the invite form below. People can also be added immediately without sending invitations – click the Add this person” button on the search results or on the e-mail invite form. Invitations can be sent later – an “Invitation” button appears by the names of all uninvited people and clicking the button sends an invitation to the corresponding person. If the person has been invited to the position but has not responded to the invitation, a “reminder” button will appear by his or her name. Click it to send a second invitation. Invitations will be forwarded to the person both under the thumbtack icon on his or her Desktop and they will also get it by e-mail. To accept, the invitee should use the link in the invitation. |
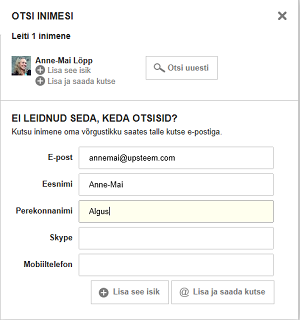 |
The PEOPLE tab in projects and activity groups displays the members as a list. To invite people to the group or project, click the “Invite people” button. 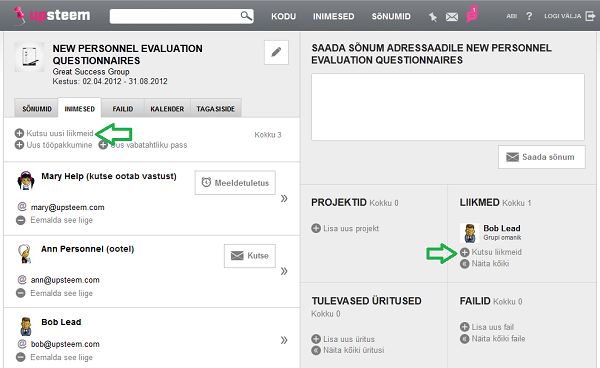 Adding people to projects and activity groups also takes place through a search. |
|
Roles and privileges
An organisation and its groups – department, projects and activity groups – can be viewed as a single graph or tree. The roles and privileges are generally group-based and the privileges run down the tree. That means that if you have the role of Manager in the department, you have viewing and modifying privileges in all departments, projects and activity groups “below” that department. As a rule, you do not have viewing privileges above your level, with two exceptions:
The following are the options for adding roles in groups:
|
|
Adding roles take place via
the RIGHTS tab on the group profile. All of the group members will
automatically be displayed and you can assign the appropriate role for each
person.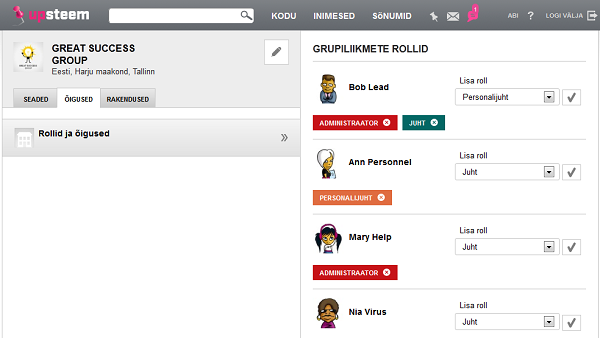 |
|
PLEASE NOTE! If you create an organisation or department, you will automatically be added as employed there and assigned the roles of Administrator and Manager. If you create a project or activity group, you will automatically be assigned the role of Administrator. For all other members you add, you must assign a corresponding role! |
|
Privileges related to roles are described in the PRIVILEGES tab of each group’s profile. The following lists all of the possible roles and describes each one:
|
 -->
-->